My version of a Purple Prince Nymph

This is a clip from my up coming book. Give it a try.

My Bead Head Purple Prince
I cannot and will not claim the creation of this wonderful fly. I fell in love with it after catching Not just my first, but of my largest Native Brookies on the Upper Rapidan river. The Variant sometimes referred to as a Psycho Prince Nymph is a variant of the Popular Prine Nymph.
The prince nymph is reported to have originated in the 1930s-1940s as The Brown Fork Tail as tied By Don and Dick Olson. It was to be included in The Buszek catalog, however Buz was trying to get his catalog to print and could only remember the name of the fly his friend Doug Prince had Tied for him. Buszek Included the fly as “The Prince Nymph.” This pattern became a wildly popular pattern. The purple version uses the attractor color of purple. I use SLF prism dubbing as I really like their color for this fly. I ave had it produce in water that just would not give up any fish. It can be tied without the weight however I fish this by dropping it at the top of a plunge pool and let it swirl in the pool. I also use Gold Tungsten beads in lieu of brass beads for extra weight.
Later Mike Mecer used the prince pattern with new synthetic materials, and the purple variant was made. The pattern I have listed is My version. It may be like other patterns. Due to its inherent Popularity among Tiers and No two tiers are exactly alike, this is a pattern many of us tie.
I fish this fly many ways. When I’m dropping through a plunge pool, I like to use it as a single fly. I also fish it under an indicator. As it is a heavy nymph, you will need a larger dry fly if you fish it dry dropper. This can be tied with or without the added weight I prefer weighted version.
BH Purple Prince
Ahrex sz 12 strait nymph hook
3.5mm Brass Bead (1/8)
Uni 70d purple Thread
.25 No lead wire
SLF Prism Dubbing
BR size Gold wire
Brown Goose Biot
Peacock Hearl
Brown Hackle (short and soft)
White Goose Biot
Start by putting the bead on the hook.

Tuck the weight wire into the bead.
Apply 7-10 wraps of your weight wire wrap. Then compress the wire to ensure a smooth wrap of the wire.

Start your thread just behind the weight wire. As you start your thread catch the tag end of the wire to bind it down. Build up a dam of thread at the end of the wire to help keep it in place. Next advance your thread toward the bead in big spirals. You do Not want the thread to go between the wraps of wire. Then reverse and go back across the wire. Do this several times to build a basket weave effect of the wire. Ending with your thread at the bead.


Once you have this net of thread you can now rotate your bobbin counterclockwise to open the thread, so it lays flat. Now wrap the flattened thread over the wire to cover the wire completely. Use only enough wraps to cover the wire and keep the thread flat during this step.

Tie in a length of gold colored Br size wire at the step down from the weight and wrap it down with tightening wraps on the top of the hook shank. Wrap your tread to the rear of the hook shank.
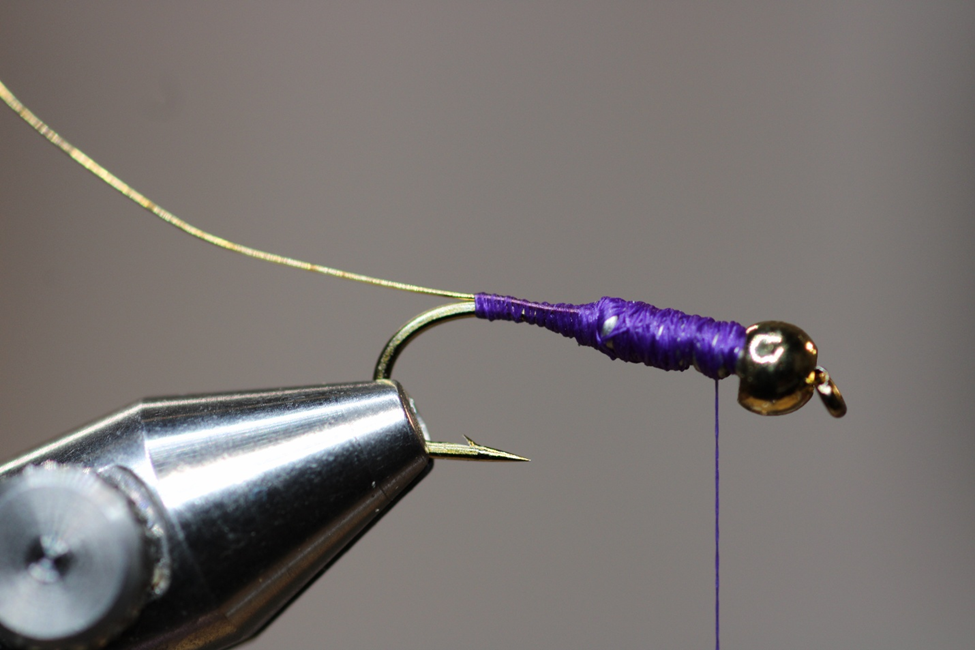

Continue wrapping Until the wire is covered and you have created an even taper up to the weighted area. Wrap a small thread ball at the rear of the hook thread. Then tie in two brown biot fibers. These should be in a v shape and a hook shank in length. Measure the biots and then transfer them to their tie in point.
A quick tip: if you like me are finger challenged, tie each biot separately to create the v pattern. Some instructors insist you tie both in as an x then trim away the excess. I find it is easier to tie them one at a time with one or two holding wraps and then tie them in with tightening wraps.
Wrap the biots to the weight portion to help smooth the transition then trim off the excess.
Wrap the thread back to the rear of the fly.

Note the ends of the biots are left showing through to illustrate where to trim them.
Establish a dubbing loop at the rear of the fly. Apply a touch of wax to the thread to grip the dubbing. Add small amount of Prism Dubbing in the middle of the loop

Using a dubbing spinner tool, twist the dubbing loop until you form a compact dubbing rope.

Wrap the dubbing to the two thirds point of the fly and tie it in.

Use the gold wire to wrap in open even spirals to create a rib and to help strengthen the dubbing

Tie in two white biots at the two thirds point. They should extend just past the end of the shank in length. Next wrap two or three peacock hurls in so they cover the ends of the white biots. Leave about a hook eye space between the peacock and the bead.
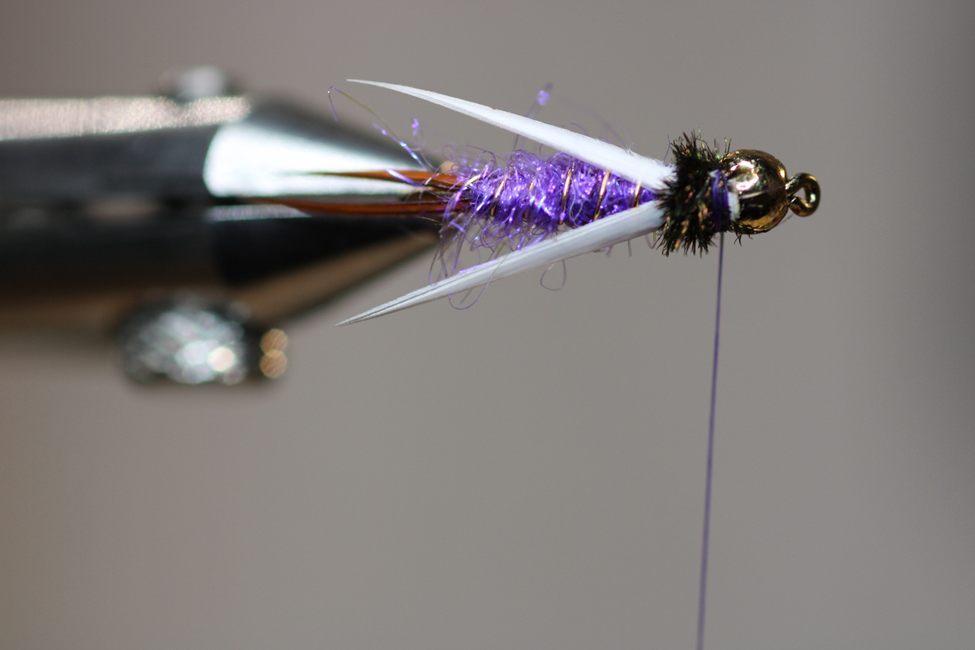
Prepare and I in a brown neck hackle just after the peacock hurl. Lightly wrap the hackle around the end of the peacock. You should only do one or two full wraps. This is not a dry fly. This will imitate legs and gills as well as help move the water as the fly drifts. Wrap a small collar of thread and apply a three or 4 turn whip finish.
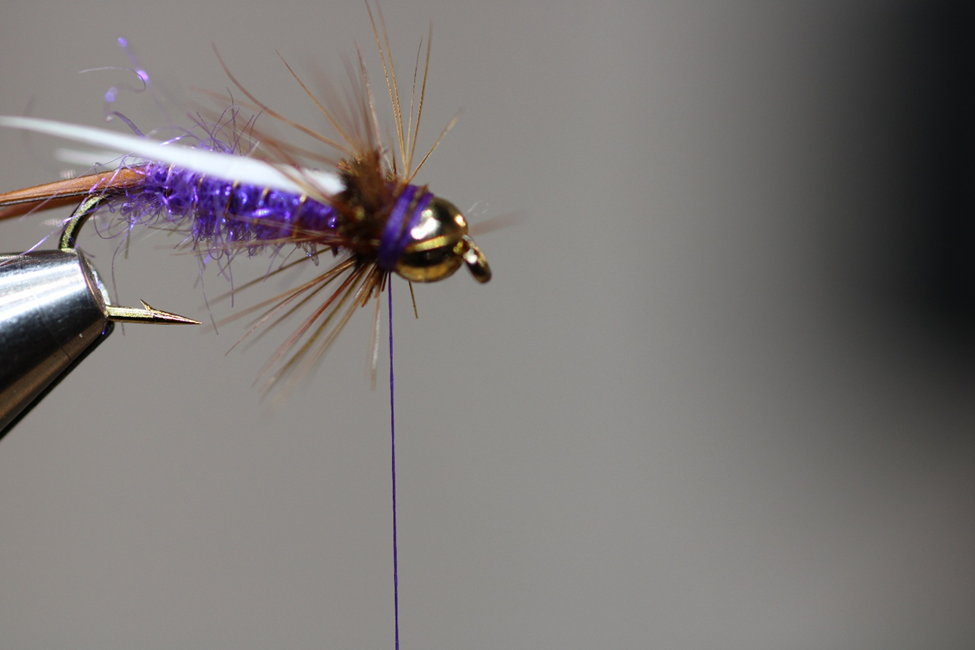
The thread band behind the bead will need a good coat of head cement, varnish or if you are inclined a touch of UV resin. If using UV I recommend Solarez thin bone dry applied with a bodkin. Trim off your thread.
